 What is Automator?
Automator is a macOS app that allows you to automate repetitive tasks and run the same list of actions easily with several files. I have mainly used Automator when I work with photo files to resize them and rename them easily. For example, when I come back from a trip where I’ve taken a few pictures, instead of storing the files with their initial name “DSC_0001.jpg”, I rename them to something meaningful like London_8Jan2017_001.jpg. This makes it easier to identify the images. I have also used Automator to batch resize and change the file type (for example from png to jpg) of photo files to use on my website and book. You can launch Automator through your launchpad or typing “Automator” on Spotlight.
Automator overview: main window and options
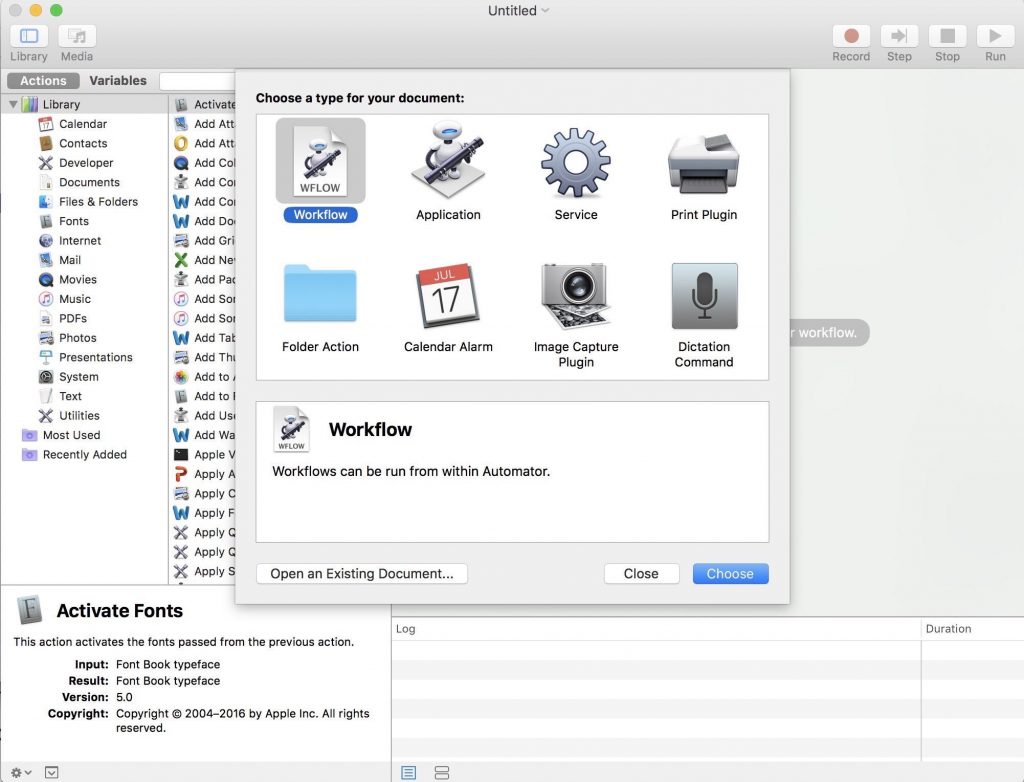
When you open Automator, you need to choose the type of workflow that you want to create. When I talk about workflow I’m referring to the list of actions that you are going to set up within Automator.
You can choose from the following options:
• Workflow: list of actions that you can run within Automator.
• Application: creates an application that runs a list of actions when you drop a file/s on the application icon.
• Service: creates a “service” which appears in the “services” menu.
• Print plugin: appears on the print dialog. Input files are pdf files.
• Folder action: list of actions is attached to the folder, so when files are dropped on the folder the workflow is executed with the files dropped.
• Calendar alarm: list of actions that is triggered by an event in the calendar.
• Image capture plugin: workflow available in image capture.
• Dictation command: the list of actions are triggered by dictation. This type of workflow has no input file/s.
You can create simple workflows or really complicated workflows using Automator. We are going to first take a look at the main components and options in Automator before going through a couple of examples. Select the “workflow” option to open the main Automator window:
The main configuration and options within this main window are very similar for all the different types of workflows. The screen is split into two main vertical areas: the left pane where you can see all the actions available and the right-hand pane where you can see the actions in the current workflow.
Left pane: On the left-hand side you can see the actions or variables available. You can toggle between actions and variables on the left pane using the buttons on the top bar. By default, actions are shown on screen on the left pane and you can see a list of all the applications and all actions available. If you select a specific application, only the actions associated with that application appear on the screen. There is a search option on the top bar that allows you to search for specific commands. We are not going to cover parameters in this first post about Automator but we will cover them later on when we go through a more complex example.
Right pane: The pane on the right-hand side shows us the current workflow, so any new actions added to the workflow will appear on the right-hand side. To add items to the workflow you can select the action on the actions pane and double click on it. The action will then be added to the end of the workflow. You can also drag and drop the action to the right location on the workflow, move actions after they have been added to the workflow or delete them clicking the cross on the top right.
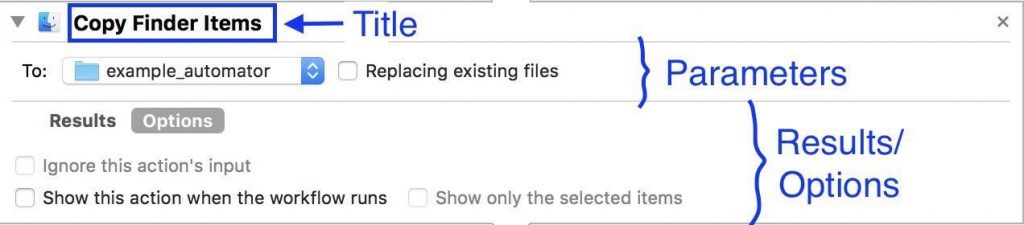
Let’s search for “copy finder items” and add this action to the workflow. Every action box has the following components once it’s added to the workflow:

1. Title: the action name appears in bold on the top of the box (“Copy Finder Items” in the above example).
2. Parameters: different parameters to configure that action (the “to” drop-down menu and the box to select “replace existing files” in this example).
3. Results/Options buttons. Pressing on results expands the box to show any results after the action runs. This is useful if we have problems with the workflow, to try to find out where the problems are. Clicking on options shows a few options that are the same for all actions.
How to create a simple workflow:
To create an Automator workflow we first need to have a clear idea of what are the input files that we want to modify, what modifications we want to perform and what are going to be the output files. Let’s create a simple example to rename a few photo files:
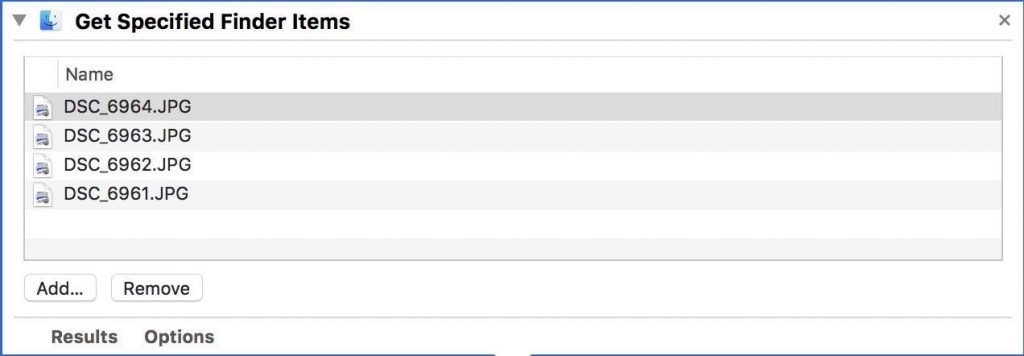
• Input files: I’m going to use 4 photo files named DSC_6961.JPG to DSC_6964.JPG (you can choose any photos).
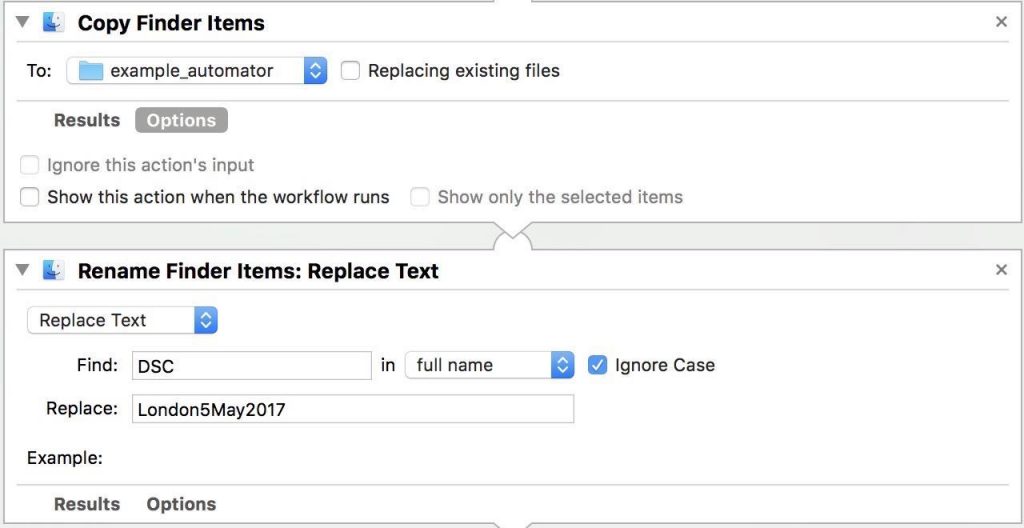
• Modifications to perform: I want to rename the files to something more meaningful that includes the location where the files were taken and the date: London5May2017_6961.JPG to London5May2017_6964.JPG.
• Output files: the same photo files renamed to London5May2017_6961.JPG to London5May2017_6964.JPG.
Let’s go through the process to create the workflow step by step:
- Step 1: Set up input files. Go to Finder and select the files that you want to modify, then drag and drop them into the workflow area in Automator. An action “Get specified Finder items” will be added with the files already selected. To select different files, you can use the options to remove/add within the action box.
- Step 2: Add the command to rename files to the workflow. Use the search bar to find the command by typing “rename”. The “Rename finder items” action appears on the actions pane. Double-click on it to add it to the workflow. A pop-up window appears asking if we want to make a copy of the old files before renaming them. I always recommend making a backup copy before you perform any modifications on files (you can delete the backup at the end). Click “Add” if you want to make a copy of the items first.
- Step 3: Set up the right parameters. Most actions have a set of parameters that you can change to configure that action. We need to set up the right parameters for both actions in the workflow: 1. The “Copy finder items” action has a single option to choose the folder where we want to copy the files. I’m going to choose a new “backup” folder that I have just created in Finder, so I will click on the parameter, select “Other” and choose the new backup folder. 2. The “Rename finder items” action has one parameter too to select how we want to rename the files. I’m going to select “Replace text”, Find “DSC” in full name and replace “London5May2017”.
- Step 4: Run the workflow. To run the workflow you just need to click on the play button on the top right of the Automator window. All the commands will be executed in order and you can see the status of each action and any error messages at the bottom of the workflow window. You can now check Finder and see if the files have been renamed as expected and delete the backup copies.
- Step 5: Save the workflow. Don’t forget to save the workflow if you want to re-use it. Go to File > Save.
This is a simple example to go through the basics of Automator; I will be posting more complex examples. In the meantime, why not think about possible uses of Automator and try to create your own workflows? What repetitive tasks would you like to automate? Give it a go and let me know if you have questions. I’ll be happy to help.